What is and why we should use Azure Key Vault?
Azure Key Vault is a cloud service (SaaS) that allows you to securly store and manage sensitive information such as API keys, passwords, certificates and connection strings. In this post, we’ll cover how to access secrets securely from your applications and what are best practices for using Azure Key Vault.
One of the primary reasons for using Azure Key Vault is to eliminate the risks associated with hardcoding secrets in your application’s configuration files. It not only eliminates the threat associated with keeping secrets in repostiory files but also separates the responsibility for managing access keys and connection strings across multiple environments. With AKV, the team responsible for deploying the application can securely handle sensitive data in a centralized way, shifting this responsibility away from developers. This allows programmers to focus on writing code without worrying about managing configuration for different environments.
Benefits of Azure Key Vault:
Azure Key Vault offers numerous benefits, particularly in enhancing security and simplifying the management of sensitive information. One of its key advantages is secure storage. By centralizing the storage of secrets, encryption keys, and certificates, Azure Key Vault ensures that critical data is kept safe in one location, reducing the risk of exposure. This is especially important when dealing with sensitive credentials, as it enables developers to avoid hardcoding secrets within application code. Azure Key Vault employs hardware security modules (HSMs) to protect cryptographic keys, further enhancing the protection of valuable assets.
Best Practices for Using Azure Key Vault
Following these best practices can help ensure your secrets are managed and accessed securely:
- Enable Soft Delete and Purge Protection
These features protect your secrets from accidental deletion. Soft Delete allows you to recover deleted secrets within a retention period, while Purge Protection ensures that no one can permanently delete secrets during that time.
- Use Access Policies and RBAC
Azure Key Vault allows you to control who can access specific secrets using Access Policies. By granting the least privilege necessary, you minimize the attack surface. For even more control, use Role-Based Access Control (RBAC) to manage permissions at a more granular level.
- Automate Secret Rotation
Regularly rotate your secrets to ensure that even if they are compromised, the risk is minimized. Azure Key Vault can work with Azure Functions or other automation tools to handle secret rotation automatically.
- Enable Managed Identity for Authentication
Using Managed Identity is the most secure way to allow your Azure services (e.g., App Service, Virtual Machines) to access Key Vault without needing credentials. Azure manages the identity for you, reducing the risk of credential leaks.
- Monitor Access with Logging
Enable Azure Monitor and Azure Security Center to track access to your Key Vault. Logging access events allows you to identify suspicious activity and act quickly in the event of a breach.
Setting Up and Using Azure Key Vault
Create a Key Vault
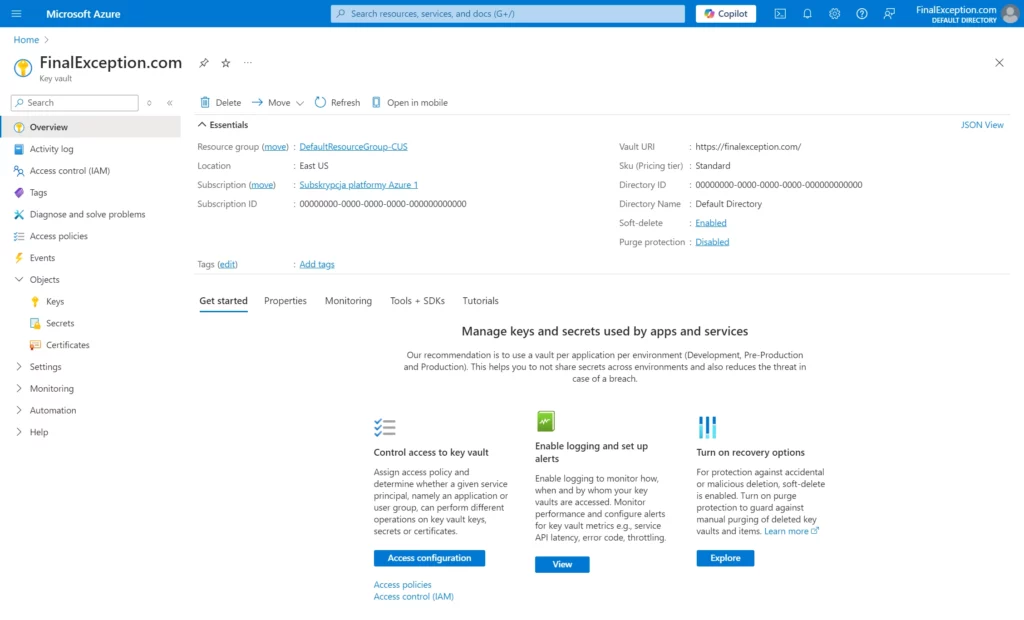
To create a Azure Key Vault service in portal, follow these steps:
- From the main page, click on Create a resource button
- Type Key Vault in search box
- Select Key Vault by Microsoft from search result
- Click Create to begin the setup.
- On the Create a key vault screen, choose your subscription and resource group, provide name for it, select a region, and pick a pricing tier. Leave the other settings at their default values.
- Click Review + Create button
- After reviewing the entered details, click Create to finalize the process.
Once the vault is created, you can start adding secrets, keys, and certificates.

Adding a secret to Key Vault
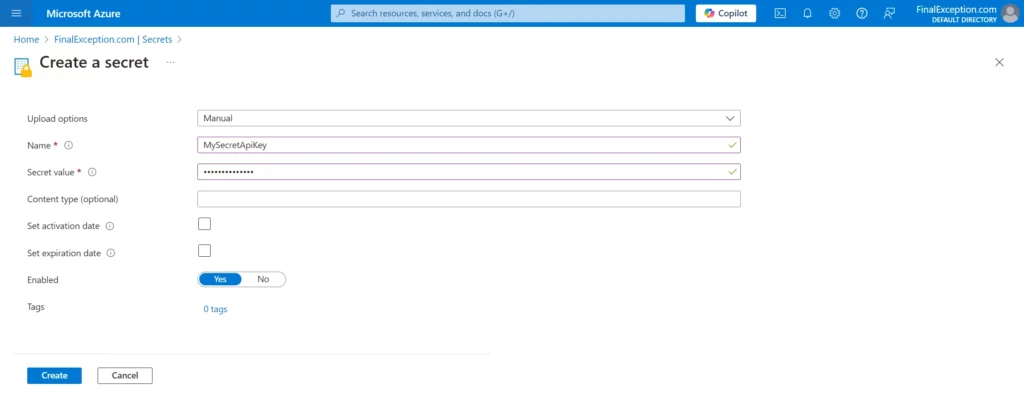
To add a secret:
- Navigate to created Key Vault service in Azure Portal
- Go to Objects -> Secrets and select Generate / Import button
- Name your secret, enter the value, and click Create.

Seting Up Access Policies
To control who can access your Key Vault, set up access policies:
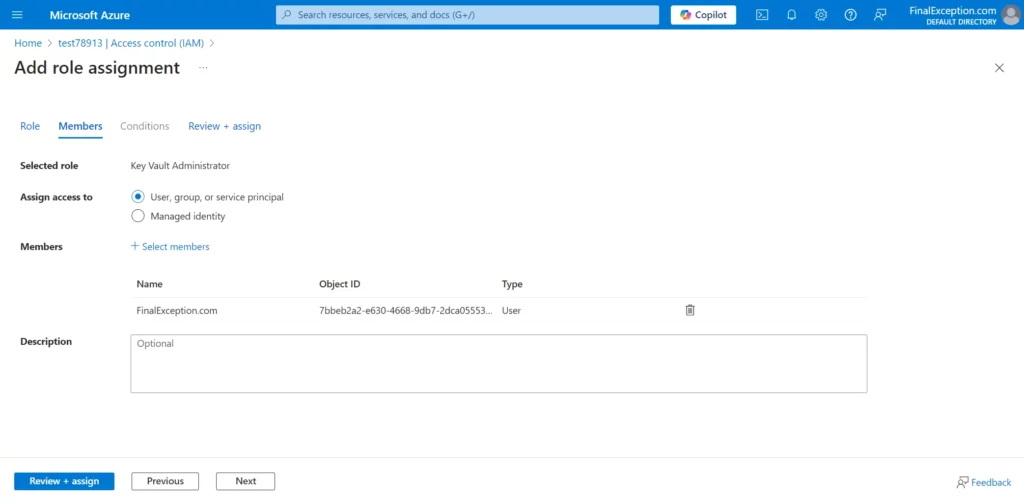
- In the Key Vault left menu, click on Access control (IAM), then Add button and finally Add role assignment
- In the first tab, we assign a role to the user who will access the secrets. For the purpose of this tutorial, we will select the Key Vault Administrator role. However, please note that this role is not recommended in production environments due to security concerns.
- In the second tab, we select the members who will be granted the Key Vault Administrator role. For the purpose of this tutorial, we will assign this role to my main account
- Click on the review + assign tab and hit review + assign button to assign role to member

Connecting Visual Studio with Azure for local development
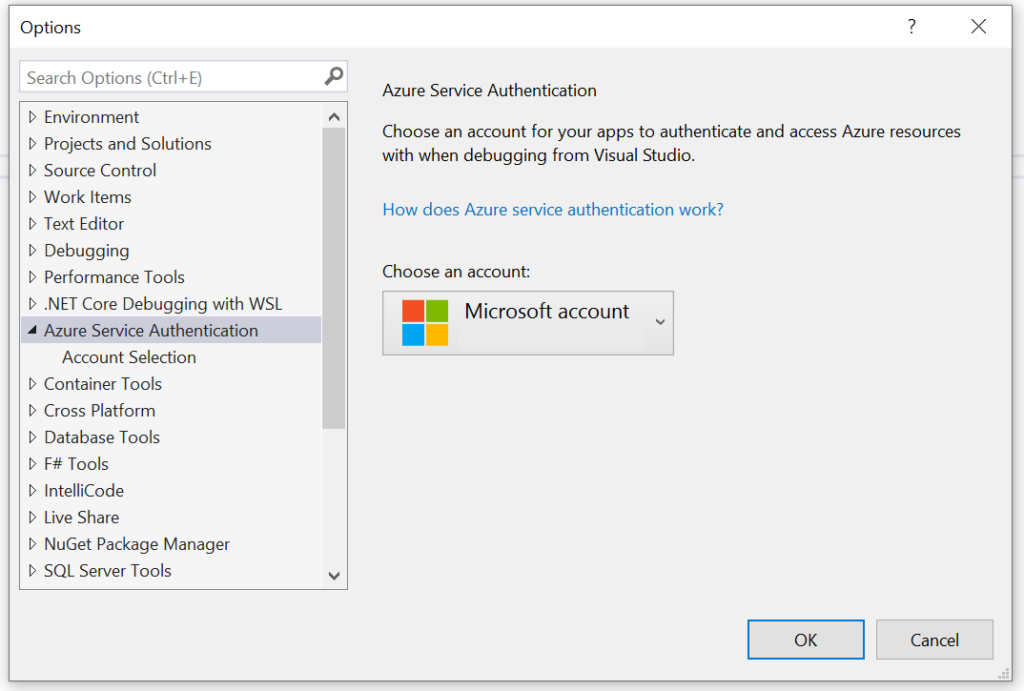
To use Azure Key Vault in our solution within a local environment, we need to connect Visual Studio to our Azure account. To achieve this, follow these steps:
- In Microsoft Visual Studio, navigate to Tools -> Options.
- In the left-hand menu, locate Azure Service Authentication.
- Select it and sign in with your Azure account

How to Access Secrets from Azure Key Vault in a .NET Core Application
Accessing secrets from your application is straightforward. In this guide, we’ll walk you through configuring your .NET Core application to retrieve and bind secrets into its configuration.
Install Required NuGet Packages
Start by installing the necessary NuGet packages:
dotnet add package Azure.Extensions.AspNetCore.Configuration.Secrets
dotnet add package Azure.Identity
Configure Your Application
Next, add the Key Vault URL to your appsettings.json file:
"VaultUrl": "https://YOUR-VAULT.vault.azure.net/"To load secrets from Azure Key Vault into your application configuration, update the Main method in the Program class. Insert the following method calls before invoking builder.Build():
var vaultUri = builder.Configuration.GetValue<Uri>("VaultUrl");
builder.Configuration.AddAzureKeyVault(vaultUri, new DefaultAzureCredential());
Accessing Secrets in Code
Once you’ve integrated, accessing secrets is as simple as retrieving any other configuration value. For example, let’s say you need an API URL and API Key for an external service. First, create a class to store these values:
public class ExternalServiceApi
{
    public string? ApiUrl { get; set; }
    public string? ApiKey { get; set; }
}
For a clean setup, add an extension method that binds the external service configuration to an instance of ExternalServiceApi. The following code will bind the secrets named ExternalServiceApi--ApiKey and ExternalServiceApi--ApiUrl to IOptions<ExternalServiceApi>. The double hyphens represent a hierarchy, meaning we have a node named ExternalServiceApi in our configuration, with two properties: ApiKey and ApiUrl.
public static class ServiceCollectionExtensions
{
    public static IServiceCollection AddExternalServiceApi(this IServiceCollection services)
    {
        services
           .AddOptions<ExternalServiceApi>()
           .Configure<IConfiguration>(
              (settings, configuration) => configuration.GetSection(nameof(ExternalServiceApi)).Bind(settings));

        return services;
    }
}
Next, we’ll inject the configuration into a service class that will expose a method GetMessage(), returning a string with the API URL and API Key.
public interface IExternalServiceApiClient
{
    string GetMessage();
}

public class ExternalServiceApiClient : IExternalServiceApiClient
{
    private readonly IOptions<ExternalServiceApi> _options;

    public ExternalServiceApiClient(IOptions<ExternalServiceApi> options)
    {
        _options = options;
    }

    public string GetMessage()
        => $"ApiUrl: {_options.Value.ApiUrl}, ApiKey: {_options.Value.ApiKey}";
}
Finally, extend the AddExternalServiceApi method to register this service in the DI container:
public static class ServiceCollectionExtensions
{
    public static IServiceCollection AddExternalServiceApi(this IServiceCollection services)
    {
        services
           .AddOptions<ExternalServiceApi>()
           .Configure<IConfiguration>(
              (settings, configuration) => configuration.GetSection(nameof(ExternalServiceApi)).Bind(settings));

        services.AddSingleton<IExternalServiceApiClient, ExternalServiceApiClient>();

        return services;
    }
}
Testing the Integration
To verify everything is working, let’s add a controller that calls the GetMessage() method to display the values. Here’s an example controller:
[ApiController]
[Route("[controller]")]
public class ApiServiceController : ControllerBase
{
    private readonly IExternalServiceApiClient _externalServiceApiClient;

    public ApiServiceController(IExternalServiceApiClient externalServiceApiClient)
    {
        _externalServiceApiClient = externalServiceApiClient;
    }

    [HttpGet]
    public IActionResult Get()
    {
        var message = _externalServiceApiClient.GetMessage();
        return Ok(message);
    }
}
Now, if you call the URL https://localhost:7286/apiservice you’ll see a response like this:
ApiUrl: https://finalexception.com/, ApiKey: 1234567890This approach works seamlessly in both local and production environments using Managed Identity or other authentication mechanisms.
Source code example
I’ve provided a complete working code example in my GitHub repository, where you can find the result of the steps outlined in this tutorial. Let me know if you’d like any further adjustments!
Conclusion
Azure Key Vault is a powerful tool for managing secrets securely in the cloud. By following best practices like using access policies, enabling soft delete, and using Managed Identity for authentication, you can safeguard your sensitive data effectively. Integrating with your applications is simple and ensures that your secrets are handled securely, whether you’re developing locally or deploying in production.

